Using OpenOCD to flash ARM Cortex M3
Introduction to OpenOCD
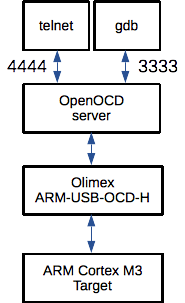
OpenOCD is a Open On-Chip debugger that provides programming, debugging and boundary-scan testing for embedded devices. OpenOCD acts as a server and accepts incoming connections from GDB via port 3333 or telnet via port 4444. GDB is used for source file step debugging. The telnet connection is used for flashing. OpenOCD connects to the JTAG adapter. The JTAG adapter connects to the target.
Information about OpenOCD is available at:
The documentation for the latest release is available at:
OpenOCD was orignally created as part of a thesis work. The thesis is available at:
The OpenOCD git repository is available at:
You can clone the git repository using:
Equipment
-
An ARM-USB-OCD-H JTAG adapter from Olimex

-
A STM32-H103 development board with an ARM Cortex M3 (STM32F103RBT6)

Build and copy binaries onto system
I installed OpenOCD by following the instructions by Peter Seng.
- Install libs needed by OpenOCD.
sudo apt-get install libusb-1.0-0 libusb-1.0-0-dev libtool pkg-config autoconf automake texinfo - Download source code
git clone git://git.code.sf.net/p/openocd/code OpenOCD
cd OpenOCD/
I got commit 30203b.
- Build and copy binaries onto the system. I think the ARM-USB-OCD-H uses some hardware internally that needs the ftdi drive. So the configure script has to be run with this flag.
./bootstrap ./configure --enable-ftdi make sudo make install - Check in which path
openocdwas installed by runningwhich openocd. On my system it was installed to:/usr/local/bin/openocd
Configure udev permissons for the Olimex ARM-USB-OCD-H JTAG-adaptor
- The
/devfolder will be populated with a new entry, e.g./dev/ttyUSB0after connecting the Olimex ARM-USB-OCD-H JTAG-adapter. This is handled by udev. - “udev is a device manager for the Linux kernel. As the successor of devfsd and hotplug, udev primarily manages device nodes in the /dev directory.” - Wikipedia.
-
We can write so called udev rules to modify among other things:
- Device node name,
/dev/olimexjtaginstead of/dev/ttyUSB0 - Change permisson and ownership of the device node
- Launch a script when a device node is created or deleted.
- Device node name,
- We will create an udev rule to change the permisson of the Olimex JTAG-adaptor. We want all users to have access to it.
- udev rules for specific devices shall be added to the
/etc/udev/rules.dfolder. - Create a new file
/etc/udev/rules.d/OLIMEX_ARM-USB-OCD-H.rules. -
Add the following line to the file
SUBSYSTEMS=="usb",ATTRS{idVendor}=="15ba",ATTRS{idProduct}=="002b",MODE="0666" -
This means that udev will match the connected device against three criteria:
- Is it usb?
- Is vendor id
15ba? - Is product id
002b?
-
If all critera match, udev will perform the given action. In this case the action is
MODE="0666"which means changing the permission of the JTAG adaptor device node to read write for user, group and all. This will allow us to runopenocdwithout doingsudo. -
More information about udev can be retrieved from:
Verify that the JTAG-adapter Olimex ARM-USB-OCD-H is recognized by the system
- Connect the Olimex ARM-USB-OCD-H to the USB port
- See a list of connect USB devices by using:
NAME lsusb - list USB devices - You should see this line:
Bus 001 Device 004: ID 15ba:002b Olimex Ltd. ARM-USB-OCD-H JTAG+RS232 - You can also check Kernel messages by using:
NAME dmesg - print or control the kernel ring buffer - Run
dmesg | grep usb. You should see:[19758.206549] usb 1-2: New USB device found, idVendor=15ba, idProduct=002b [19758.206554] usb 1-2: New USB device strings: Mfr=1, Product=2, SerialNumber=3 [19758.206556] usb 1-2: Product: Olimex OpenOCD JTAG ARM-USB-OCD-H [19758.206558] usb 1-2: Manufacturer: Olimex [19758.206559] usb 1-2: SerialNumber: OLXUC26R [19758.262864] usbcore: registered new interface driver usbserial [19758.263069] usbcore: registered new interface driver usbserial_generic [19758.263218] usbserial: USB Serial support registered for generic [19758.284464] usbcore: registered new interface driver ftdi_sio [19758.285436] usbserial: USB Serial support registered for FTDI USB Serial Device [19758.286481] usb 1-2: Ignoring serial port reserved for JTAG [19758.286551] usb 1-2: Detected FT2232H [19758.286552] usb 1-2: Number of endpoints 2 [19758.286554] usb 1-2: Endpoint 1 MaxPacketSize 512 [19758.286555] usb 1-2: Endpoint 2 MaxPacketSize 512 [19758.286556] usb 1-2: Setting MaxPacketSize 512 [19758.291425] usb 1-2: FTDI USB Serial Device converter now attached to ttyUSB0 - The ARM JTAG-adapter is now available as
/dev/ttyUSB0
Configure OpenOCD for JTAG-adapter Olimex ARM-USB-OCD-H
We must tell OpenOCD what JTAG-adapter and development board we are using.
OpenOCD documentation regarding how to create a configuration file:
http://openocd.sourceforge.net/doc/html/OpenOCD-Project-Setup.html#OpenOCD-Project-Setup
We will create an OpenOCD configuration file openocd.cfg but most of the settings we need are imported from existing configuration files:
-
Interface configuration:
/usr/local/share/openocd/scripts/interface/ftdi/olimex-arm-usb-ocd-h.cfg -
Board configuration:
/usr/local/share/openocd/scripts/board/olimex_stm32_h103.cfg -
Target configuration:
/usr/local/share/openocd/scripts/target/stm32f1x.cfg(included byolimex_stm32_h103.cfg)
We make additions to tell OpenOCD on what ports to make the telnet and gdb connections available:
telnet_port 4444
gdb_port 3333
Our openocd.cfg looks like:
#daemon configuration ################################################
telnet_port 4444
gdb_port 3333

#interface configuration #############################################
#
# Olimex ARM-USB-OCD-H
#
# http://www.olimex.com/dev/arm-usb-ocd-h.html
#
source [find interface/ftdi/olimex-arm-usb-ocd-h.cfg]

#board configuration #################################################

# Olimex STM32-H103 eval board
# http://olimex.com/dev/stm32-h103.html
source [find board/olimex_stm32_h103.cfg]

gdb_memory_map enable
Start OpenOCD and connect to target
-
Start the OpenOCD server in one terminal window
openocd -f openocd.cfg -
Open a second terminal window and connect to the server using telnet
telnet localhost 4444 -
You can check available targets by running
targets: http://openocd.org/doc/html/CPU-Configuration.html#Target-Listtargets TargetName Type Endian TapName State -- ------------- ---------- ------ ------------------ ------------ 0* stm32f1x.cpu cortex_m little stm32f1x.cpu halted
OpenOCD commands
A list of all OpenOCD command can be found at http://openocd.org/doc/html/Command-and-Driver-Index.html#Command-and-Driver-Index. Below is a list with some examples.
-
flash banksPrints an one-line summary of each device that was declared using flash bank: http://openocd.org/doc/html/Flash-Commands.html#Flash-Configuration-Commands
-
flash probe numIdentify the flash, or validate the parameters of the configured flash. The num paramter is a vlue shown by
flash banks. -
reset haltPerform as hard a reset as possible, using SRST if possible. The optional parameter specifies what should happen after the reset. If there is no parameter, a reset run is executed. halt - Immediately halt the target
-
reset runPerform as hard a reset as possibl and then run the program.
-
haltHalt target execution.
-
regShow register values. The target must be halted.
-
reg <register> <value>Set
to . The target must be halted during this operation. The new values will be held in internal OpenOCD cache until target execution is resumed. A single step is also ok. -
stepSingle-step the target at its current code position.
-
versionDisplays a string identifying the version of this OpenOCD server. http://openocd.org/doc/html/General-Commands.html#Misc-Commands
-
stm32f1x mass_erase numMass erases the entire stm32lx device (all flash banks and EEPROM data). This is the only way to unlock a protected flash (unless RDP Level is 2 which can’t be unlocked at all). The num parameter is a value shown by
flash banks: http://openocd.org/doc/html/Flash-Commands.html#index-stm32lx-mass_005ferase -
arm semihosting [enable|disable]Display status of semihosting, after optionally changing that status. Semihosting allows for code executing on an ARM target to use the I/O facilities on the host computer i.e. the system where OpenOCD is running. The target application must be linked against a library implementing the ARM semihosting convention that forwards operation requests by using a special SVC instruction that is trapped at the Supervisor Call vector by OpenOCD. http://openocd.org/doc/html/Architecture-and-Core-Commands.html#index-arm-semihosting
-
flash write_bank num filename offsetWrite the binary
filenameto flash banknum, starting atoffsetbytes from the beginning of the bank. Thenumparameter is a value shown byflash banks. Example:flash write_bank 0 test_set_led_on.bin 0
Using the commands above we can do the following sequence to flash the target and run the program. The name of the binary is test_set_led_on.bin. We will flash it to bank 0.
reset halt
stm32f1x mass_erase 0
flash write_bank 0 test_set_led_on.bin 0
reset run